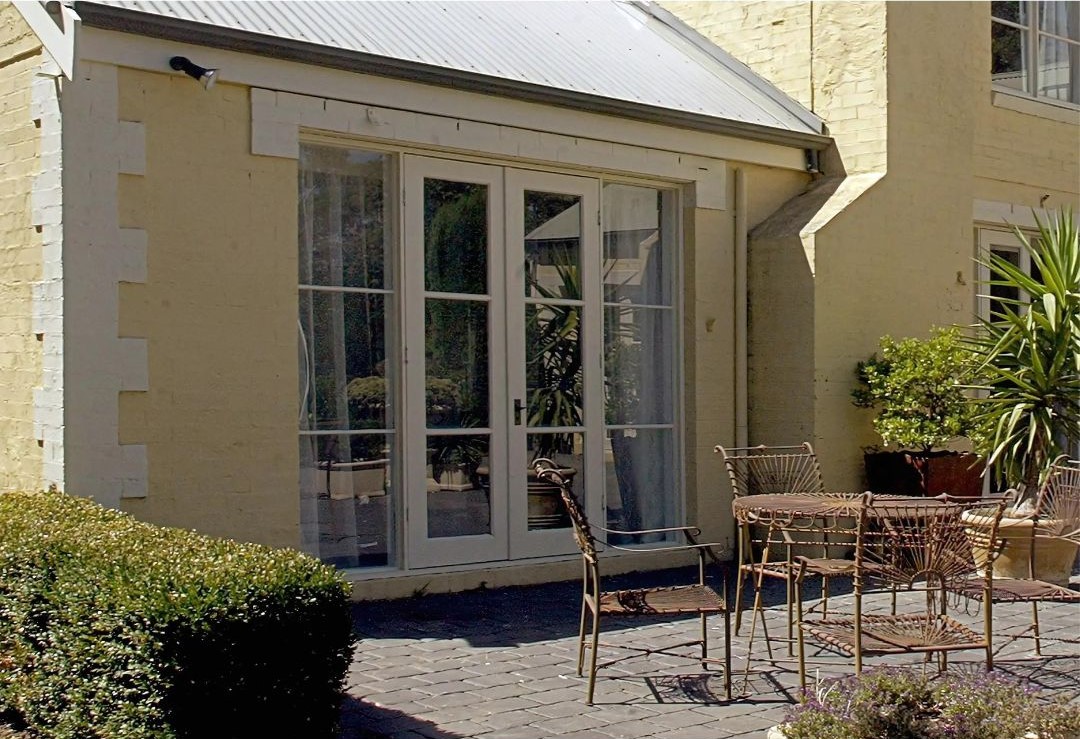
Draught proofing doors can be a little tricky at times and among standard hinged doors, the common French Doors can present specific problems that can be difficult to overcome.
I want to begin by saying something about draught proofing of doors and aesthetics. If your door was not constructed with seals built into it, then you are relying on aftermarket draught seals. These will largely be visible and therefore will affect the perceived aesthetics of the door.
French doors tend to be a feature of a home and some grander homes can have many French doors inherent to the architecture of the period style. Adding draught sealing components will inevitably require aesthetic compromises to be made. Yes, it is possible to disappear some components, but others not at all. That is just how it is.
And now, let’s begin by defining a few terms so we’re all on the same page before we get into the nitty gritty.
Some basics:
- French doors are simply double doors that are glazed. Everything that applies to French doors also applies to unglazed double doors.
- There is a commonly active door, and an inactive door. You use the active door to pass through on a day-to-day basis.
- The active door latches to the inactive door. The inactive door is usually secured to the door jamb by some kind of top and bottom bolts. Fasteners that can be undone. So while it can be made to open, commonly, it rarely is opened.
- Because the active door latches into the inactive door, there needs to be some kind of door stop built into the system. The active door needs to bump into something so that it can stop and latch.
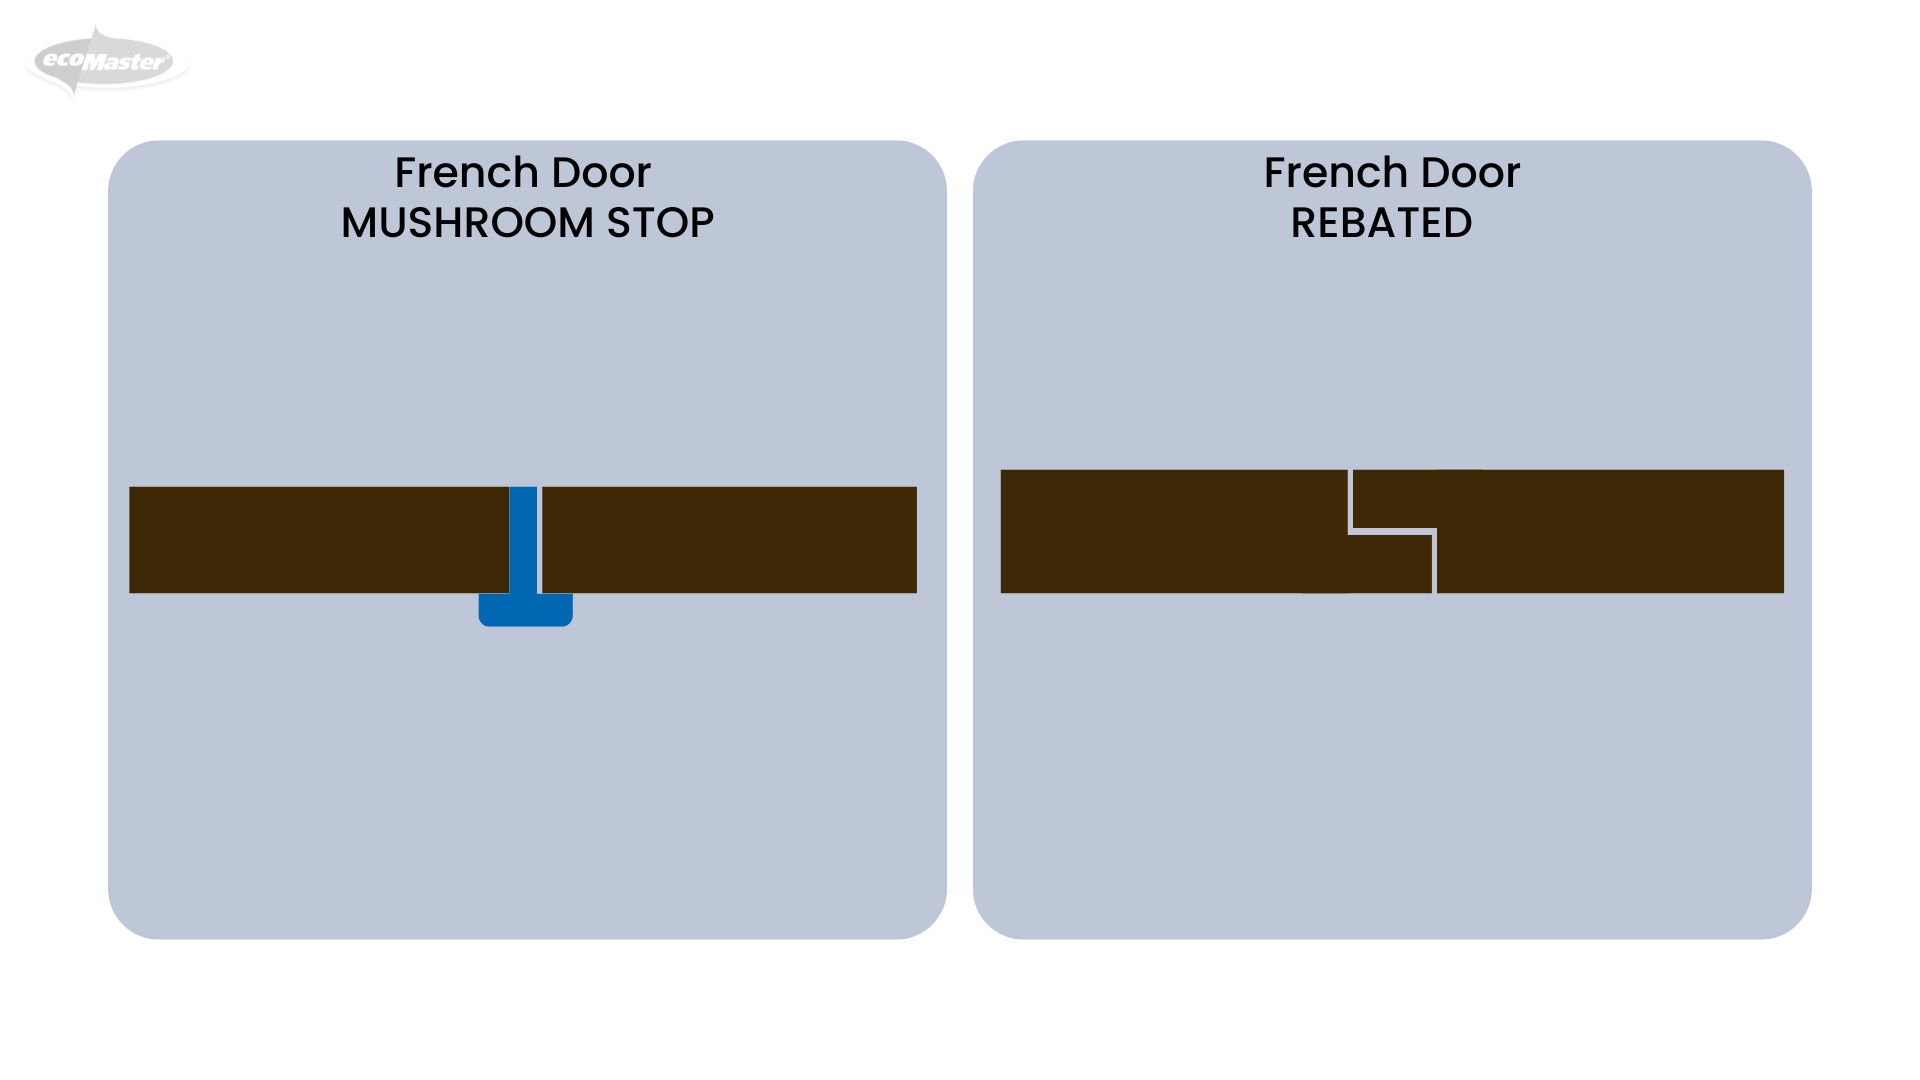
- The “door stop” comes in two common flavours. We need to think of the centre join of the doors to figure out how the systems work. The systems are either a “mushroom stop” or “rebated doors”. Mushroom stops are most often on the outside and so these kinds of doors most often open inwards. Rebated doors can be arranged to open inwards or outwards. Let see what these look like:
Why is this important?
It’s because it contributes to limitations of components and how components may be fitted. We will get to that a little later.
Now that we have taken a look at how the centre join works, the next thing to take a look at is the bolts used to secure the inactive door to the door jamb. Again, this is important because it will show us what components may be easily used and what components will be more difficult to use.
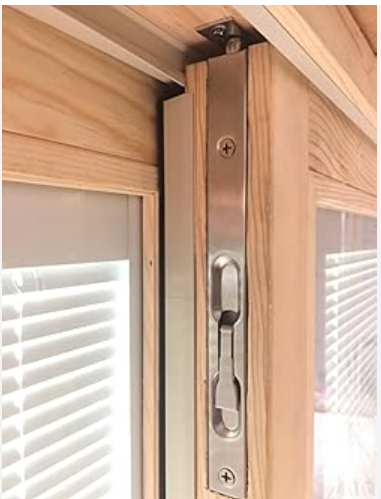

image credits: austyle.com.au

image credits: earlysettler.com.au
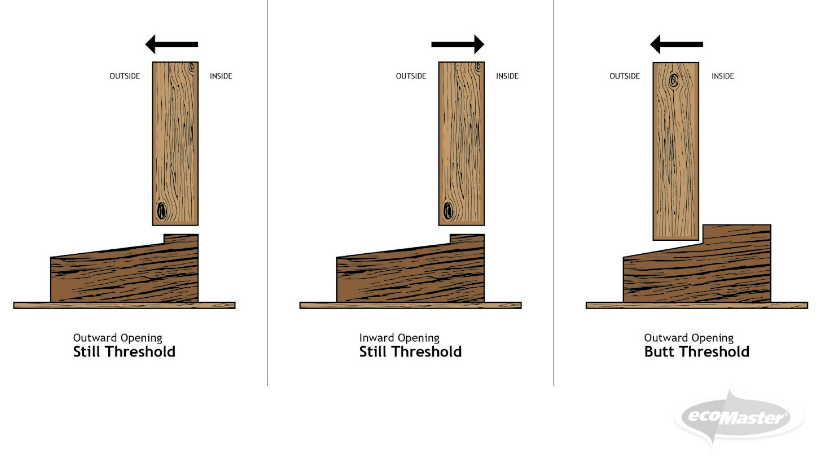
These bolts are simply the most common arrangements, it’s not an exhaustive list. Finally, let’s take a look at the most common threshold arrangements. Apart from those mentioned here, thresholds can also be flat and other times they are brickwork or tiling. Anything and everything is possible.
Now that we are familiar with the amazing variety that are known as French doors we can consider how to go about draught proofing your French doors. There are just three things we need to treat in order to do an amazingly good job:
- The perimeter – the sides and the top of the door jamb.
- The astragal – that’s a fancy way of saying a component that seals the centre join.
- The bottom draught excluders – at the bottom of the door.
OK, that sounds pretty simple right? Well, maybe it is and maybe it is not. Before we take a look at these I want to go over a few draught proofing basics which may help you get the best possible job.
Door Draught Proofing Basics
- Adding draught proofing components to a door will not make it work better. If your door is difficult to open or close or latch, fix these things first.
- It is entirely possible that your French doors may not have a sufficiently consistent centre gap. It is easier to “check in” or “pack out” hinges to adjust this than it is to attempt to plane the edge of the door.
- If the active door is warped inwards, you can sometimes minimise this by slight movement of the hinges. Fill the existing hinge screw holes using match sticks and PVA glue before pilot-drilling new screw holes.
- It’s best to add all draught-proofing components in the same plane. So either all inside or all outside. But sometimes that’s just not possible.
OK, that’s it, now let’s get draught proofing.
1. PERIMETER SEALS

Here are some common perimeter seals and how you might choose which one suits your application. This is going to examine seal starting from most inexpensive through to more robust and long lasting.
Weather stripping: No, just no. If you are considering this you are in the wrong place. Go back! Just in case you don’t know what “Weather stripping” is, it is inexpensive self adhesive stuff that comes in a roll and is designed to be crushed between the face of the door and the jamb. It is most often too small or too big. It is this stuff that makes your door incredibly difficult to close once it has been installed. It may also potentially warp your door over time.
EMV: Our own product, EMV, is quite a versatile seal and may be suitable as your perimeter seal. Fit into the jamb behind the edge of the door and then fold into a V shape. It’s inexpensive and easy to install. It is hidden in the jamb so pretty good if aesthetics are a major consideration.
Things to watch out for:
- It will not stick to anything that is not smooth. If your door jamb paint has some bumpiness to it or if it’s stained then you may have problems with adhesion.
- EMV has a limited gap filling capacity. You will need a minimum of 2 mm and a maximum of 7 mm of gap.
- If the top edge of your doors are not smooth or remain unpainted, the EMV may tend to bind on them.
- You may need to replace them occasionally.
Draught Dodgers for Doors: Made in our factory and loved far and wide as a versatile, high quality and long-lasting perimeter seal. Some of the crazy door gaps that have been treated by Draught Dodgers have at times astounded even ourselves. We expect these to last as long as the door itself.
These perimeter seals fit to the side of the door jamb on the opposite side to the opening action. If your doors open inwards then the Draught Dodgers are fitted on the outside and vice versa. Choose between raw hardwood, white aluminium or black aluminium with seals to match.
The inclusion of the fitting packer and Draught Dodgers self-adhesive nature makes it easy to fit them for maximum effect. These will not impinge on the opening and closing of the door.
Things to watch out for:
If there is a tricky part to this when it comes to French doors, it is at the transition from one door to the other. Two things can be happening here either individually or in combination.
- Quite often the top of the active door is bent away from the jamb, the result of previous applications of weather stripping. This makes it misaligned with the inactive door. It is best that the top section of the Draught Dodger is cut in two pieces, one for each door. Fit the section for the active door using the fitting packer in the usual way. Then, when fitting the section for the inactive door, use the fitting packer nearest the hinge side and then gradually fit the Draught Dodger a little closer to the door so that the centre is closer to meeting the one from the active door.
- If your doors are fitted with a mushroom stop then this poses a bit of a problem for the top Draught Dodger section. There are a few strategies for dealing with this:
- You can stop the Draught Dodgers either side of the mushroom stop.
- You can shape the Draught Dodgers to go over the mushroom stop. There will not be any seal fitted over the mushroom stop.
- You can cut a small section of the mushroom stop to allow the Draught Dodgers to pass straight through. This can be done either using a multi-tool (also known as a renovator tool) or with a sharp chisel.
RP78: This is a perimeter seal similar in nature to Draught Dodgers. It fits and acts in a similar manner however, the RP78 is screw fixed. Why use an RP78? If you specifically need acoustic benefits or if you live in a bushfire zone then the RP78 is your go-to perimeter seal. The installation instructions included in the packet are quite good.
Things to watch out for:
- Being screw-fixed sounds quite easy but is reasonably difficult. The screw holes in the RP78 are very slightly elongated to allow a small amount of adjustment, however, this is only possible if ALL of the screws are fitted exactly in the centre of the slots. In practice that is quite hard to do.
- The screws are supplied but are quite small and it is very easy for your screwdriver or impact driver to slip out of the screw head and embed itself in the fragile silicone seal. The seal will be destroyed and you will need to buy another device and start again. It’s best to mark the slots on the jamb and carefully pilot the fixing holes with a 2.5 mm drill before trying to fix the RP78. If you are fixing into metal, use one of the self-drilling screws to cut all of the threads before trying to fit the RP78. These things will reduce the risk of damaging the seal during installation.
- The fixing screw cover tends to shrink over time, leaving an unsightly half-finished look about it. Best to cut the cover strap a centimetre longer and bunch it up.
- Never cut the seal on the saw. You will tear it.
- All of the same door transition issues mentioned above also hold true for the RP78.
- Unless you specifically need acoustic or bushfire performance, you will have a much easier time with Draught Dodgers.
2. ASTRAGAL

When it comes to the centre seal there really is not a lot of choice. Here they are:
EMV: This often makes quite a good astragal seal. It can be fitted either to the active or inactive door as you prefer. As always, it needs a minimum of 2 mm and a maximum of 7 mm gap. If you have a larger gap then it is possible to use opposing EMVs such as when the two Vs come together they can bridge more than 7 mm. One EMV needs to be fitted on each door and the alignment needs to be carefully controlled. If you need this arrangement, cut a couple of test pieces and de-tack the adhesive so that you can test the alignment.
Things to watch out for:
- You may need to trim the EMV around the latch keeper or the latch itself. If you have rebated flush bolts you will also need to trim around those. In this case, it may be better to fit the EMV to the active door. As always with EMV, it only adheres to smooth surfaces.
RP16: These are super! They will never need to be replaced and are an architectural quality astragal. Also acoustic and fire zone compliant. The device is fixed into the side of one door and its silicone blade is depressed by the closing of the other door. Wow, sounds exceptional right? Well yes, it is exceptional however there are some things to consider.
It can be quite a difficult installation. There is almost always some kind of rebate needed on the fixing side to go around obstacles such as the latch keeper or the latch itself.
If you have rebated doors then you can fit the RP16 either on the inside or the outside. With doors having a mushroom stop the RP16 will have to go on the inside.
Things to watch out for:
- The RP16 is a great device but it is not very tolerant of misalignment of doors such as when the active door is warped at the top. More than about 7mm of warping will cause the silicone seal not to reach the opposing door.
- The fixing screws are parallel to and pretty close to the surface of the door. Be sure to pilot drill every screw hole before fitting the screw. Failure to observe this may cause splitting of the door surface.
- Some doors have a small bullnose detail near the centre join. If that’s your door then take care to angle the fixings away from the surface so that the screws are not seen breaching the surface in the bullnose valley.
- Making the required rebates into the fixing wing of the RP16 can be quite time-consuming and it is easy to make a mistake. Sometimes a rebate is not necessary but at other times, particularly if your doors are fitted with flush bolts, you may need to make 3 rebates.
- When making rebates, great care needs to be taken not to damage the seal and not to scratch the visible surface.
- To take a view of whether this is within your scope of expertise take a look at this video:
3. BOTTOM DRAUGHT EXCLUDERS
At this point we have the greatest amount of choice. We will discuss each in turn so that you can decide which, if any, best suit your particular needs.
RP4 Storm Seal: This is a really good and effective device comprising a treadplate and a ribbed seal fixed to the bottom of the door. For French doors, you will require two of these.
While these are not expensive, they are one of the more difficult installations. They require cutting the bottom of the doors to make space for the treadplate and the seal that will be fixed to the bottom of the door.
Obviously the doors will need to be removed, laid flat on a protective surface, cut and fitted with the seals and then refitted.
Things to watch out for:
- If your doors are fitted with either flush or security bolts then these will have to be removed before cutting the doors and will need to be re-rebated and refitted afterwards. This becomes quite a long and tedious process. Likewise, if your doors have a security device embedded in the bottom of them that will also need to be removed and repositioned.
- When marking the doors for cutting, be sure to measure the distance (25mm) from the threshold rather than from the bottom of the doors. It’s a mistake you will only make once!
- When cutting the bottom of your door do not simply cut once with a circular saw. You will splinter the face of the door and it will not be good. There are several ways to avoid this but I won’t go into those here.
- For best results, the centre join between the two RP4 seals should be on an angle. That is, do not cut them square. If you square cut them you will always see a gap in the middle of the seals at the bottom of your door. If you cut them at an angle they can be fitted tighter and you will not see a gap even if a small one still exists. The treadplates can be square cut and butted up. If you have rebated doors, the angle should mirror the change of level according to the rebate.
- The seals do last a long time but eventually, the seals on the bottom of the door will have to be renewed. The good news is that this is a reasonably easy task.
RP35: This is a long time “go to” device for us. It has never failed, not even once. It’s a type of “automatic” draught excluder. That’s because when the door is closed the internal seal is driven down onto the threshold and as the door is opened it lifts the blade clear of the threshold. Two of these either butted up or fitted on either side of an RP16 are an excellent choice for French doors.
The RP35 is face-mounted on the door. In the picture below, you can see two RP35s butted up together under a mushroom stop that has been trimmed for this purpose. What is not so obvious in the picture is the use of an RP95 treadplate to make up the level in front of the lip that normally exists in the threshold under the door itself. Without the treadplate the blade does not raise off the threshold quickly enough and trips on that lip.
If your doors open outwards then the RP35s would need to be fitted internally.
Things to watch out for:
- RP35s are best machine cut. Take note of which face is going to be the visible face, put a pencil mark on the opposite face and ensure that only the face with the pencil mark goes on the saw. This will prevent the saw from scratching the face that will be seen.
- Make sure you follow the instructions and file an extra 1mm off the internal seal holder.
- RP35s are awesome however they are not tolerant of a non-flat threshold and a non-flat door surface. Both of these will create an unsatisfactory result.
- When fitting the RP35, use a couple of carpenters packers of about 7mm at each end and rest the RP35 on them. This will ensure that the device is parallel with the threshold and at a suitable height to allow for flawless operation.
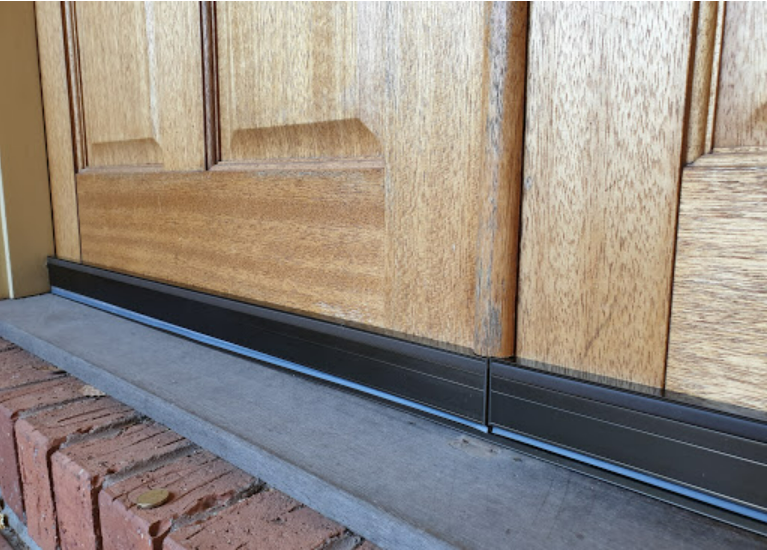
RP8: This is the same device as the RP35 however it is designed to be rebated into the bottom of the door. If you are concerned about the aesthetics of your doors then this may be for you. As with the RP4, this does require removing your doors and cutting a rebate into the bottom of them. If there are flush bolts, security bolts or security sensors all these will need to be removed and alternative arrangements made. It will not be possible to reinstate these devices.
You will usually also need an RP95 treadplate.
RP5 and RP26: These are “sweep” seals. They are inactive. When the door is closed the blade of the sweep seal must press onto something to actually make a tight seal. They must inherently clear all obstacles as the door is opened.
The RP5 is a medium-duty self-adhesive device and the RP26 is a heavy-duty screw fixed device. By the way, if you know your RP things you may be wondering about the RP17 which is also a sweep seal. And to this, I say no, just no. In my view there is no legitimate use for the standard RP17. (Yes, we use a modified one in our Cavity Sliding Kit but that is the only use).
If the doors are outward opening on a sill-style threshold, the sweep seals can be fitted to the outside face of the doors so that they can make on the threshold when the doors are closed and will swing over a falling threshold as the doors are opened.
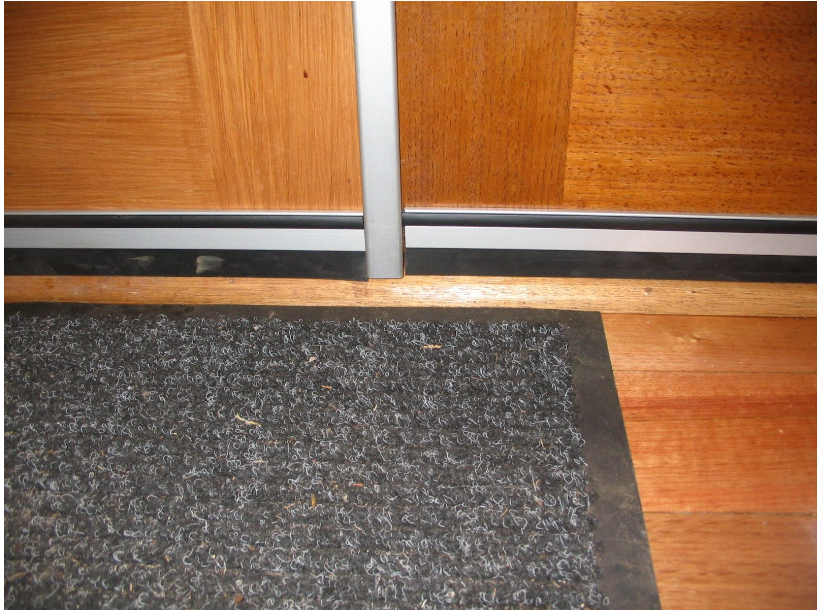
On inward opening doors, they can often be made to seal on a timber moulding such as in the accompanying picture or on a section of weather stripping fixed onto the inside edge of the threshold.
Things to watch out for:
- Face-mounted bolts are a particular obstacle when fitting sweep seals internally. Either discontinue the sweep seal on either side of the bolt or replace the barrel bolt with something larger like a panic bolt that can simply glide over the top of the sweep seal.
- If you chose to use RP5s on the outside and they are in the weather, consider screw fixing them.
What to fit first, second and third?
As you will have seen already there are loads of options when it comes to treating French doors. And that means that there are lots of possibilities about the order of installation. Lets see if we can summarise:
- If you are installing an RP16 on the same side as the perimeter seal then fit the head of the perimeter seal first, the RP16 second and then fit the draught excluders. You can then fit the sides of the perimeter seals which will butt down onto the draught excluders.
- If you are fitting an RP16 on the opposite side of the perimeter seal then fit the RP16 first. If you are using RP35 draught excluders then fit those before the perimeter seal. If you are using sweep seals you can fit the perimeter seal next and then fit the sweep seals in between the perimeter seal.
- If you are using EMV for the astragal, you can fit that at any time. Whether the perimeter seal or the draught excluders comes next depends on the exact components as in the previous case.
- In the previous picture you can see the inside bottom of inward opening French doors. The RP16 is fitted first and the RP26 sweep seals butt up to the RP16. They seal against the tri-quad moulding that trims the inside threshold. The perimeter seals are on the outside of the doors. The perimeter seals could be fitted before or after the internal internal treatments.
Where to now?
If all this is just a bit too confronting you are definitely not alone.
This is exactly why we have devised the ecoMaster French Door Kit, to take the tricky bits out while still providing an effective solution.
The ecoMaster French Door Kit comes in two variants, the Sill Kit and the Butt Kit. Which one you need is shown in the following diagram. The kits use Draught Dodgers for Doors as the perimeter seal and EMV as the astragal (you know that means the centre seal right?).
The Sill Kit includes two RP5 sweep seals which can be fitted internally or externally depending on the opening direction of your doors.
The Butt Kit includes two half lengths of Draught Dodgers fitted with a brush pile and these are fitted to the inside bottom of the doors so that the brush pile seals against the inside of the threshold.
And voila, the only decision to make is whether to have Timber perimeter seals with bronze RP5s or White perimeter seals with silver RP5s.

A Final Word
We have covered most everything to do with draught proofing French Doors. Nonetheless, I’m sure there are some bizarre door setups that defy any or all of these common treatments. Unfortunately, joineries and individuals are free to make things in whatever fashion they so desire and sometimes that means that they are more difficult to treat.
At least you are now armed with the knowledge to know the scope of treatments that are available and how you might combine them for your specific project.
I hope that in some small way we have progressed the draught proofing of French doors.
What’s Next?
We hope this article has helped you learn how to use simple ways to save on your utility bill. This in turn will help you on your energy and thermal efficiency retrofit journey to make your home more comfortable all year round, and reduce your costs and carbon emissions.
Next, explore How To Step Into Savings: Draught Proofing Your Home Made Simple.
If you found this article helpful, then please subscribe to our YouTube Channel. You’ll find many more helpful “How To” videos there. You can also follow us on Facebook and Instagram to stay in the loop. For more great information on how to make your home more energy and thermally efficient subscribe NOW to ecoBites. ecoBites are free bite size chunks of the latest energy efficiency information making it quick and easy for you to absorb.

Recent Comments